Every church has one or more paper forms or cards the attendees and guests can fill out to receive information, update their personal information or request follow up from someone serving at the church. Without Fellowship One, that process is typically a photocopy, distribute and pray that follow up happens proposition.
With Fellowship One, those paper forms become modeled electronically, distribution to the appropriate person occurs automatically and actual follow up progress is visible to all users. This document explains the workflow of modeling one of those paper forms into what we call a Contact Form. Each contact form contains 1 or more Contact Items. Each contact item represents a single response to a specific request by someone serving at the church. Each item has a specific person that is responsible to see that contact is made with the congregant.
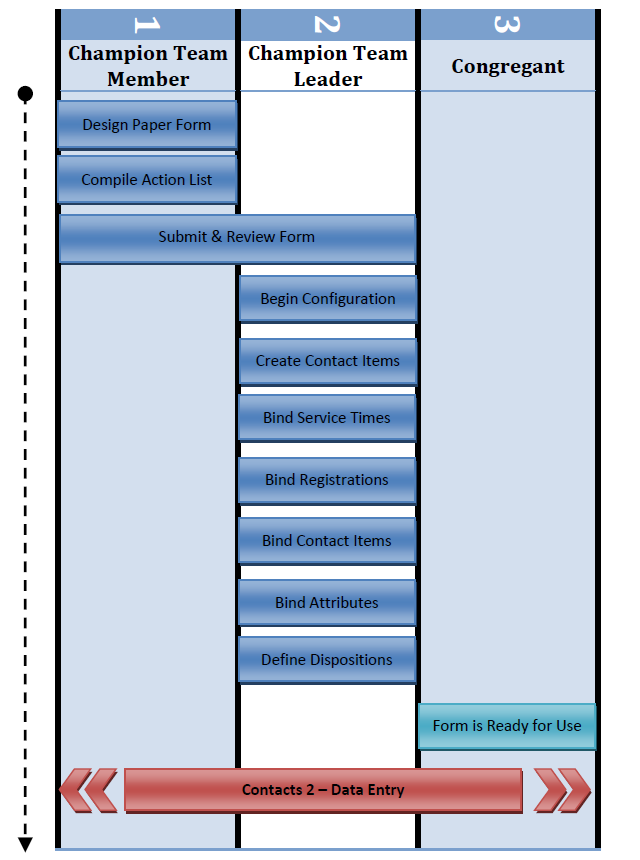
Whenever the church has a need for a new form, this process should be followed to prepare Fellowship to receive the data collected by the form. After the modeling step is completed, a filled out card is ready to be entered into Fellowship One. The process can be viewed in the Data Entry document.
When an individual ministry determines that a new data collection form is needed, a paper representation should be designed with the appropriate fields, checkboxes, questions, etc. that will be filled out by congregants of the church. This should be coordinated by the Champion Team Member representing that specific ministry department as they have the best understanding of how to translate the information collected on the form into the appropriate data elements in Fellowship One.
This form should contain a unique title which can be something as simple as “Connect Card” or “Visitor Information”. The items on the form might include things like: “I would like more information about….” or “I would like to volunteer for….” Service times can be listed on the form if the form is typically filled out during certain services and you would like to know during which service the card was collected. Finally, registration information is explained later in this document.
Imagine all of the actions that the church could take in response to any of the fields, questions, checkboxes that could be filled in on the form. Each action or more accurately, reaction, must be performed by someone serving the church. It may be a church staffer or key volunteer. Who will be responsible for each action that could be generated by something on the card? Perhaps there are no actions required and only data entry will be performed.
That list will define the user routing rule in Fellowship One for each Contact Item. For example, a “Children’s Ministry” contact item would be routed to a children’s ministry leader or key volunteer. Along with the paper form, prepare a list of those actions and the name of the person that should be configured as the first responder for each.
Note: Contacts are initially routed to only one person and then can be transferred to others if needed.
The paper form and action list with responsible users should be submitted to a Champion Team Leader for review and configuration. The purpose of the form, the needs of the ministry and suggested approach to capture the data elements in Fellowship One should be presented by the Champion Team Member. The leader and member should agree on the best solution using elements such as:
Think about how each contact item will be worked within Fellowship One. What will be the flow? Who will update what and when? These questions should be answered before configuring anything.
The Champion Team Leader will now configure the form in Fellowship One, making it ready for use. They will do this under the Admin Tab and then select Contact Setup in the left side navigation menus. Under that section, each of four main options will need to be defined:
The first step is to create a Contact Form container to hold the Contact Items that will follow. This is done under the Contact Types section. It is simply a unique name for the form that is being configured; for example, “Communication Card” or “Guest Registry”.
Contact items are the actions to be taken by someone serving the church that could be generated by the form. The action list created earlier will be used here. Each item requires the following information:
There may be items that are not specific enough to be routed to a single person for follow-up. For example, items such as “Comments,” “Requesting Other Information,” or “Other Volunteer Opportunity” provide the church with a catch-all to funnel contact items which will alleviate the church from setting up a multitude of contact items. This process is called Triage & Transfer and is best used when one of several people might respond to a particular contact item. Either a team of people are sharing the load of doing follow-up or different people should receive the same contact item depending on the notes, age, or ministry that generated the item. In all cases, the contact item is routed to a single person who determines who should really work the contact and transfers it to the correct portal user or group to be worked.
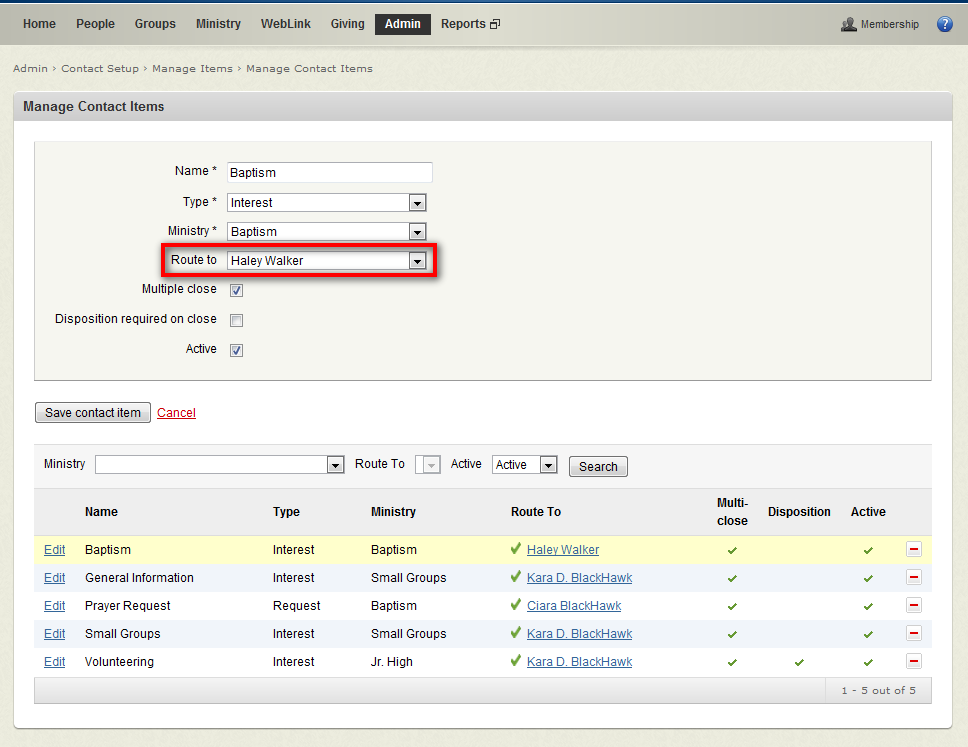
Although this field is not required to create a contact item, it is strongly recommended that someone be selected. This will ensure accountability for every item.
Remember to create one contact item for each action you take. If there is a box on the form that says “First Time Visitor” and at your church all first time visitors get a call and a letter, you will create two contact items: one for the First Time Visitor Call and one for the First Time Visitor Letter. The Letter can be sent out in mass and closed together; therefore Multiple Close would be checked. The First Time Visitor Call would not have Multiple Close selected for that item because each person would need a personalized entry in the contact item history unless you use Phone Tree for your call.
Each contact form can be “bound” to one or more service times. Each service time is an Activity defined in the Ministry area of the portal with an associated Activity Schedule. When bound to a Contact Form, those service times can be selected when entering data from a card filled out by a congregant. This will provide the knowledge of when and what service/activity a particular card was collected giving the church a better understanding of how long ago a request was made. The Portal will display this information if collected and reports can be generated that show contact totals resulting from specific service times.
The step is optional if there isn’t a specific Activity during which a card/form may be collected.
When binding service times to a contact form, the dates and times for previous month and the next four months are available to use. The church can decide what service times are selectable during data entry and for how long. They will remain as selectable options on the screen during the data entry process until they are manually removed. It is suggested that once a month, the previous month’s dates be removed and the current month’s dates be added to each contact form to prevent accidental selection of old dates or dates that haven’t happened yet.
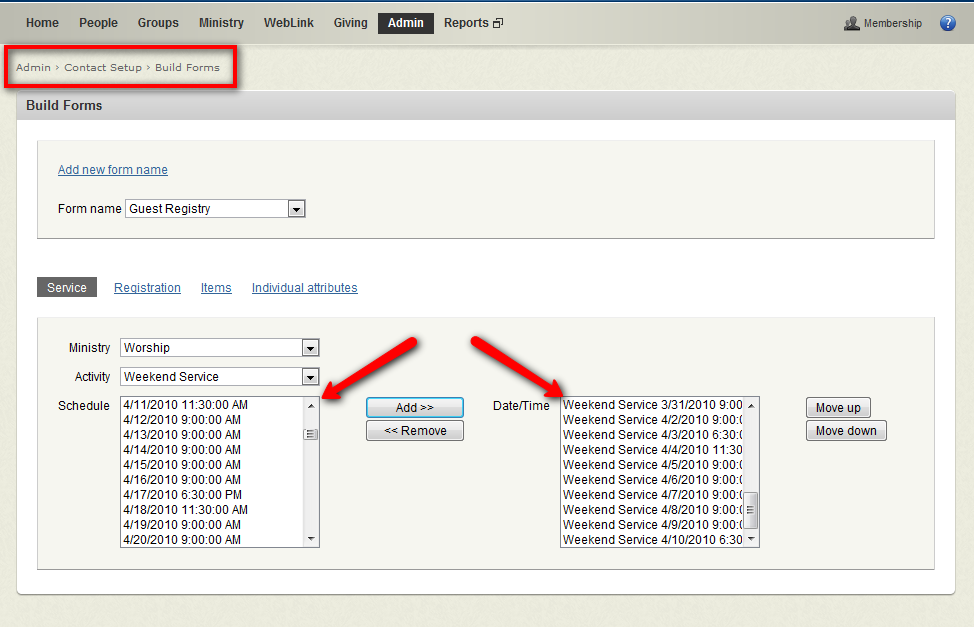
Remember, only activities that have been created under the ministry tab are available in the Ministry/Activity drop down list. The dates that appear under the schedule are based on the activity schedule created when the activity was created. If dates are not appearing in the list as you think they should check the activity schedule > reoccurrence and verify the configuration.
You can bind the same service time to multiple contact forms and a single contact form can be bound to multiple services/activities.
You can bind activities and activity schedules with a contact form in another way that will create a Participant Assignment when selected during data entry. For example, let’s say you have a Baptism event each month. You have created the activity in Fellowship One and the activity schedules for the next 3 months. If you have a check box on a signup form that reads "Sign me up for Baptism" on your contact form, you can bind your Baptism activity and next schedule with the contact form that represents the signup form. During data entry, the box is checked and a participant assignment is automatically created for the person in the Baptism activity for the schedule you previously bound.
Limitation: Assignments are only created for the activity and activity schedule; not for a specific RLC, breakout group or date/time within the activity. It is a known limitation. Also, no staffing assignments can be created using this option; only participant assignments can.
If this is too limiting, consider using a contact item that is associated with the appropriate ministry. When the contact is created, the ministry will be notified and make the proper assignments based on availability and possibly contact the individual with more information regarding the event. This can be done from the Ministry tab >> Participants and Assignments menu options. If there is only one RLC for the activity, the limitation may be workable.
The contact items for a form are created first, by themselves and then bound to the form. This allows each contact item with its routing, ministry, etc. information to be used on multiple contact forms without having to duplicate that information for each form. For example: if you have Baptism requests coming in from the guest registry card, a faith decision card, a recommitment card, and the children’s salvation card, all may go to the same pastor on staff so one contact item can be reused across all of those contact forms.
Only those contact items that have been bound to the contact form will be available for selection during the data entry process.
Individual Attributes are custom fields that a church wants to keep track of for specific individuals. Some typical examples are:
In these examples, no direct follow up is required but does provide useful information and is known at the time a guest card or decision card is entered into Fellowship One. Instead of creating those attributes in a separate action, they can be created at the same moment the contacts are created if they are bound to the contact form ahead of time.
Think about what attributes are being tracked by the church. Which values are known at the time a card is filled out and returned? Bind those to the Fellowship One contact form that represents that card. Save your team a lot of time and frustration. Become a hero!
Some reports that are great at showing these trends based upon attributes would be M4080G or A4000E. You can also search in the reporting tab for the word “executive” for more trend reporting options.
A disposition is a predefined value that describes the current state of a contact item or the final state of the contact upon closing. Each church can define their own. Some examples might be:
At a minimum, you should define:
The purpose of a contact disposition is to categorize each contact into known “buckets” to help the church measure success or failure over time of their follow up efforts. This can’t be done by only looking at the contact status of Open, In Progress or Closed. When used, we have reports designed to show how many contacts fall into each disposition bucket such as P1084G, P1084E, or P1089. Over time you should say we want 60% of contacts to fall into a Successful category.
Be wary of creating too many contact dispositions. Try and think of them as categories that contacts need to fall into rather than trying to have every possible outcome documented as a disposition. For example, having one contact item that says “Left Message” might include situations such as “Left Message on Cell Phone” or “Left Message on Work Phone” or even “Left 3 messages” when all 3 are basically the same thing.
The form is now ready to be distributed to the church congregants to be filled out at all relevant activities. If there are any differences between what is on the form and how the data entry team should handle the form, it is best to document those items and communicate them to the data entry team as well as the Champion Team.
After completing this process, continue to the Data Entry document to view the workflow process for entering the data from a filled out card into Fellowship One.